
Rochester Dualjet carburetor idle circuit technical information including how the idle circuit works and necessary adjustments
1979 All (except 3.3L 200" V6)
Purge ports, consisting of a constant and times bleed purge, are provided in the throttle body to purge fuel vapors stored in the vapor canister during idle, off-idle, and part throttle operation.
The black plastic limiter caps on the idle mixture needles are no longer used. To provide a tamper-resistant idle mixture setting, a hardened steel plug is staked in the idle mixture needle openings. These plugs are not to be removed unless required for cleaing or part replacement.
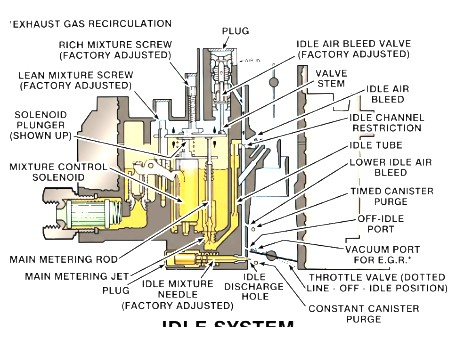
1979 3.3L 200" V6
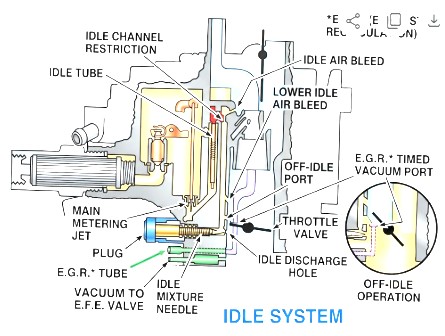
1979 E2ME GENERAL APPLICATION:
- Buick 3.8L (231") V6 California Automatic
- Chevrolet Passenger 3.8L (231") V6 California Automatic
- Oldsmobile 3.8L (231") V6 California Automatic
- Pontiac 3.8L (231") V6 California Automatic
A conventional Dualjet type idle system is used except that air metering to the idle system is controlled by an idle air bleed valve located in the air horn. The idle air bleed valve follows movement of the mixture control solenoid plunger to control the amount of air bled into the idle system to lean or richen the mixtures. The movement (or 'cycling') of the solenoid plunger, down (lean) or up (rich), occurs ten times per second, thereby controlling fuel and air mixtures to achieve, as near as possible, ideal air/fuel mixture ratios.
The idle mixture needles are recessed in the throttle body casting an sealed with a hardened steel plug to discourage tampering with the factory adjusted mixture setting in the field, which could upset exhaust emissions. The plugs must not be removed and idle mixture screws readjusted unless required due to major carburetor overhaul or throttle body replacement in which case special service procedures must be followed carefully.
CAUTION: the computer controlled catalytic converter system is sensitive to idle mixture adjustment. No attempt should be made to readjust idle mixture screws in the field unless required due to a driver performance complaint, emissions failure, major carburetor overhaul, or throttle body replacement in which case special factory service procedures must be followed carefully.
REMOVING AND REPLACING IDLE MIXTURE SCREWS
Remove idle mixture needle and plug as follows:
- Using a punch between the two locator points in throttle body beneath idle mixture needle plug (manifold side), break out throttle body to gain access to the idle mixture needle plug. Then, drive out hardened steel plug covering mixture needle.
- NOTE: Hardened plug will shatter rather than remaining intact. It is not necessary to remove the plug completely; instead, remove loose pieces to allow use of idle mixture adjusting tool or standard deep socket.
- Using deep socket, remove idle mixture needle, washer, and spring from throttle body. Repeat procedure a and b for remaining idle mixture needle.
Install idle mixture needle, washer, and spring using idle mixture adjusting tool or deep socket. Lightly seat needle and then back out specified number of turns as a preliminary idle mixure adjustment. Final idle mixture adjustment must be made on-car using factory recommended procedures.
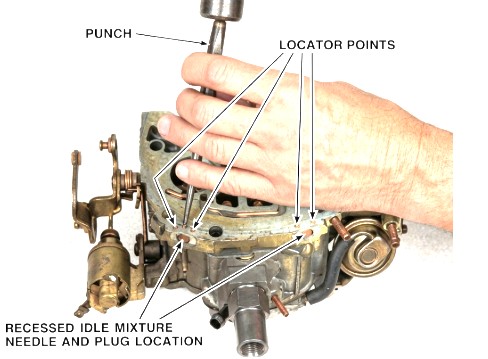
1979 E2ME Adjustment Procedure
- Remove carburetor from engine, following normal service procedures to gain access to the plugs covering the idle mixture needles
- Invert carburetor and drain fuel into container
- With carburetor inverted, place on a suitable holding fixture using care to avoid damaging linakge, tubes, and parts protruding from air horn
- Using tool J028709 or 4.5mm (3/16") thin wall deep socket, turn each idle mixture needle inward until lightly seated. Then, back out each mixture needle 4 1/2 turns
- Reinstall carburetor, except do not install air cleaner and gasket
- Start engine, run until fully warm, and repeat idle air bleed valve adjustment. If unable to set to 25-35* dwell, and dwell is below 25*, turn both mixture needles OUT an additional turn. If dwell is above 35*, turn both mixture needles IN an additional turn. Then, readjust idle air bleed valve to obtain dwell limits
- If necessary, reset burn idle speed to specifications as shown on emissions control information label under hood
- Check and, if necessary, adjust fast idle speed as described on emmisions label
- Disconnect dwell meter and tachometer
- Unplug and reconnect vacuum hoses
- Reinstall air cleaner and gasket
