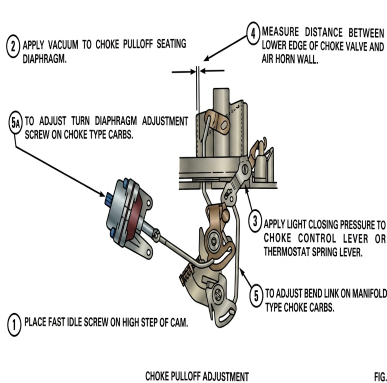
Choke Pulloff Adjustment
Choke Adustment
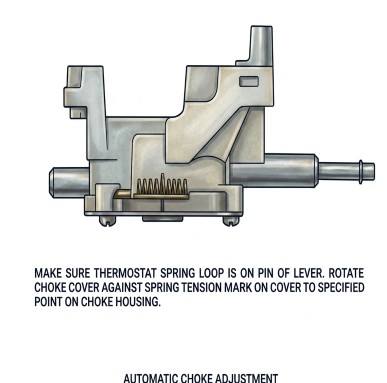
Based on the technical diagram provided for the Holley Model 4360 (a spread-bore 4-barrel carburetor, often branded as the "Economaster"), here are the step-by-step instructions to properly adjust the automatic thermostatic choke.
Pre-Adjustment Requirements
-
Engine Status: The engine must be completely cold before starting this procedure.
-
Tools Needed: A flathead screwdriver or 1/4" wrench (depending on retainer screws).
Step-by-Step Choke Adjustment Procedure
Step 1: Engage the Choke Mechanism
Before adjusting the housing, slightly depress and release the accelerator linkage once. This unloads the fast idle cam and allows the choke plate to snap shut freely.
Step 2: Verify Internal Component Alignment
Look closely at the diagram's indicator markings near the spring mechanism:
-
Crucial Alignment: Ensure the thermostat spring loop inside the choke cap is properly hooked onto the pin of the internal lever. If the spring loop misses this pin, turning the housing will have no effect on the choke plate.
Step 3: Loosen the Retainer Screws
Locate the locking screws securing the choke cover ring to the housing. Loosen them just enough so that you can rotate the plastic/bakelite choke cover with your hand, but not so loose that it wobbles or separates from the unit.
Step 4: Rotate the Choke Cover to Index
Find the index alignment marks (the series of small vertical lines shown in the center of the diagram):
-
To tighten the choke (if the engine stalls/runs lean when cold): Rotate the choke cover against spring tension to increase force on the choke valve.
-
To lean out the choke (if the engine blows black smoke/runs rich when cold): Rotate the cover with spring tension.
-
Factory Alignment: Align the primary mark on the choke cover with the specified index point cast into the metal choke housing.
Step 5: Secure and Test
-
Tighten the retainer screws firmly to lock the choke cover in position. Do not over-tighten, as you can crack the housing.
-
Turn on the vehicle's ignition switch (or start the car) and monitor the choke plate.
-
As the engine or electric element warms up, verify that the choke plate transitions to the fully vertical (open) position.
Note on Tuning: If the choke opens too soon during initial cold operation, loosen the screws again and rotate the cap counter-clockwise one notch at a time. If it opens too late, rotate it clockwise one notch at a time.
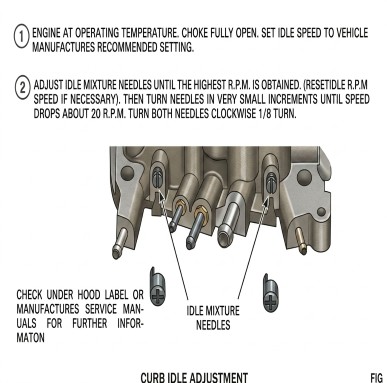
4360 Idle Mixture Adjustment
Based on the provided technical diagram, here are the step-by-step instructions to perform a curb idle adjustment and set the idle mixture on a Holley 4360 carburetor.
Pre-Adjustment Setup
Warm Up the Engine: Ensure the engine is running and has fully reached its normal operating temperature.
Check the Choke: Verify that the choke plate is fully open.
Set Initial Idle Speed: Adjust the curb idle speed screw until the RPM matches the vehicle manufacturer's recommended baseline setting (usually found on the under-hood emissions label).
Idle Mixture Adjustment Procedure
The Holley 4360 features two idle mixture needles located at the base of the carburetor. Adjust them using the following method:
Step 1: Find the Highest RPM
Turn the idle mixture needles incrementally to find the point where the engine reaches its highest (peak) R.P.M. * Note: If the idle speed increases significantly during this step, reset the idle speed screw back to the manufacturer's recommended R.P.M. before proceeding.
Step 2: Lean Out the Mixture
Once peak RPM is achieved, turn the needles in very small increments until you see the engine speed drop by approximately 20 R.P.M. (this leans out the mixture slightly).
Step 3: Final Optimization
From that drop point, turn both idle mixture needles clockwise exactly 1/8 turn.
?? Pro-Tip: Always reference your vehicle's specific under-hood emissions label or the manufacturer's factory service manual for exact factory RPM specifications, as these can vary slightly based on the year, make, and model of the vehicle.
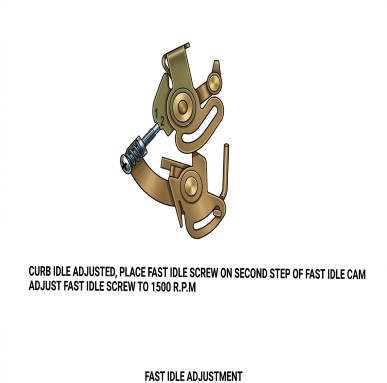
Holley 4360 Fast Idle Adjustment
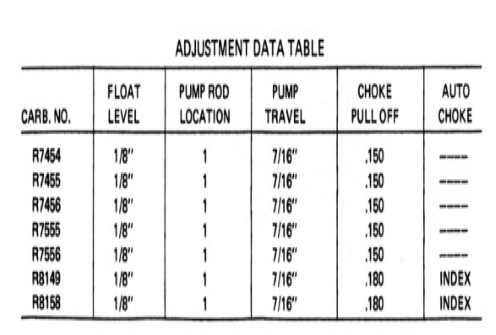
Adjustment DATA
Trouble Shooting Holley 4360 Choke
Troubleshooting the choke on a Holley 4360 (the compact, spread-bore 4-barrel, often called the "economizer" carb) usually comes down to addressing three key areas: mechanical binding, thermal capsule performance, or a misadjusted fast idle cam.
Because these units came with either an integral electric choke or a remote intake-mounted thermostatic coil, the exact symptoms point to distinct mechanical or electrical failures.
1. Primary Symptoms & Direct Fixes
Symptom A: Choke Won't Close (Hard Starting When Cold)
If the engine cranks endlessly when cold and won't catch without starter fluid, the choke plate isn't snapping shut to richen the fuel mixture.
The Unloaded Linkage Check: Before starting cold, depress the throttle pedal once to release the fast idle cam. Look at the choke plate. If it’s still standing wide open, the bi-metal spring has lost tension, or the mechanical linkage is binding.
Binding Linkages: Road grime and varnish accumulate quickly on the choke shaft and external rods. Spray the pivot points thoroughly with carburetor cleaner. Never apply oil or grease to these linkages; it acts like a magnet for dust and turns into a sticky sludge.
Spring Engagement: On integral electric models, remove the three index cap screws. Verify that the inner hook of the bi-metal coil is actually caught on the internal choke shaft lever. If it slipped off, the spring is turning inside the cap without moving the plate.
Symptom B: Choke Won't Open (Black Smoke, Loading Up, Stalling)
If the engine starts fine but begins to chug, blow black smoke, or foul plugs as it warms up, the choke is staying closed or pulling off too slowly.
Electrical Power Dropout (Electric Choke): Use a multimeter to verify you have 12V DC at the positive terminal of the choke cap only when the engine is running.
Critical Wiring Note: Never tap directly into the positive (+) side of the ignition coil. The dropped voltage from a ballast resistor will prevent the choke heating element from warming up completely. Always source clean, switched 12V power from the fuse block or an alternator stator terminal.
Faulty Ground: The electric cap grounds through its metal hold-down ring to the carburetor body. If the carburetor body has heavy corrosion, or if non-conductive gasket sealant was used on the mounting flange, the ground path breaks and the element won't heat up.
Failed Thermostatic Coil: If you have the remote style with a rod running down to a well in the intake manifold, the pocket fills with carbon and rust over time. Clean out the intake well to ensure exhaust heat is actually reaching the coil.
2. Mechanical Calibration: Step-by-Step
Adjusting a Holley choke requires setting the thermostatic cap index first, followed by verifying the vacuum breakdown step.
Loosen the three retaining screws on the black choke cap. Loosen it just enough so the cap can rotate. Open the throttle slightly to release the fast idle cam, then turn the cap until the choke plate just closes completely. From that zero point, align the index mark on the cap with the center specification mark on the housing (usually index centered or 1-2 notches rich, depending on climate). Tighten the lock screws.
2.Verify Choke Pulloff (Vacuum Break):Manual check.When the engine fires, high manifold vacuum instantly pulls the choke plate open slightly (about 1/8" to 1/4") so the engine doesn't flood itself. On the 4360, this is managed by an internal vacuum piston or an external diaphragm pod. Push the diaphragm rod manually to simulate vacuum; the choke blade should crack open cleanly to the specified gap. If the diaphragm is ruptured, replace the assembly.
3.Set Fast Idle Cam Position:Visual alignment.With the choke fully closed, the fast idle screw must sit on the highest step of the fast idle cam. As the choke opens, the weighted cam drops, lowering the idle speed step-by-step. If the screw misses the steps or binds against the side of the cam, bend the thin connecting rod slightly to center the alignment.
3. Component Reference & Assembly Guide
When rebuilding or inspecting the choke housing assembly, ensure all components match the layout below. Misplacing the internal baffle plate or using the incorrect gasket will block the airflow necessary to pull heat through the housing.
Fast Reference Diagnostic Table
SymptomProbable Root CauseQuick Test / VerificationPlugs fouling during warm-upBroken or unhooked bi-metal coilPull cap; look for cracked or uncoiled spring steel.Choke stays closed on hot daysBlown fuse or zero voltage to capProbe positive wire; check for true 12V with key ON.Engine fires then stalls immediatelyMisadjusted or leaking vacuum breakApply vacuum to diaphragm; check if arm cracks choke plate open.High idle stays stuck at 2,000+ RPMFast idle cam binding on linkageTap cam manually; check for stickiness caused by gum/varnish.