
Adjusting the Holley 1901 Float
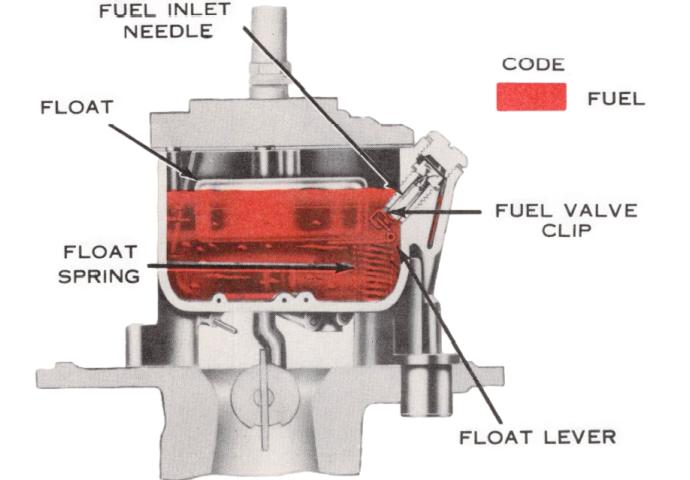
The Holley 1901, also known as the "Visiflo" or "Tea Cup" carburetor, is a unique concentric design used primarily on Ford and Mercury V8 engines in the early 1950s. Adjusting the float on this model is different from standard carburetors because the fuel bowl is part of the main body and the floats encircle the venturi.
Tools Required
-
Screwdriver (to remove the main body cover)
-
Float Gauge (or a 1/4" drill bit as a substitute)
-
Needle-nose pliers
Step-by-Step Instructions
1. Remove the Main Body Cover
Unlike most carburetors where the float is attached to the "lid" (air horn), on the 1901, the floats stay inside the main body. Remove the screws from the top cover and carefully lift it off to expose the twin floats inside the bowl.
2. Prepare for Measurement
The Holley 1901 uses two float pontoons connected by a single bracket. You must ensure the fuel inlet valve (needle and seat) is fully closed to get an accurate reading.
-
Invert the carburetor: Carefully turn the entire main body upside down so the weight of the floats holds the needle valve closed.
3. Measure the Float Height
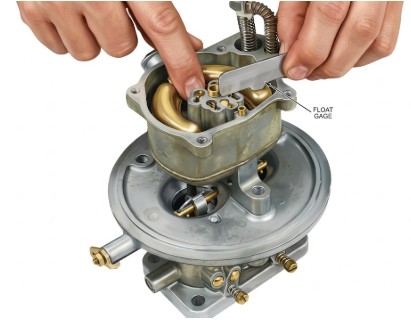
Measure the distance from the rim of the float chamber (the gasket surface) to the top of the float.
-
Specification: The standard dry setting for the 1901 is 1/4 inch (0.250").
-
Place your gauge or a 1/4" drill bit across the bowl rim. The top (crown) of the floats should just touch the bottom of the gauge.
4. Adjusting the Pontoons
If the floats are not at 1/4 inch, you must bend the metal tang.
-
To Lower the Fuel Level: Bend the tang towards the needle valve.
-
To Raise the Fuel Level: Bend the tang away from the needle valve.
-
Alignment Check: Ensure both float pontoons are level with each other. If one is higher than the other, the carburetor will provide inconsistent fuel delivery. Carefully twist the bracket arms until they are perfectly symmetrical.
5. Check Float Drop (Optional but Recommended)
Turn the carburetor back to the upright position. The floats should drop enough to fully open the needle valve but not so far that they hit the bottom of the bowl or bind.
-
If the drop is excessive, bend the stop tab located on the back of the float hinge.
6. Final Reassembly
Check the main body gasket for any tears. Reinstall the cover and tighten the screws in a star pattern. Because the 1901 has a glass or metal "bowl" assembly, ensure the seals are tight to prevent external leaks.
