

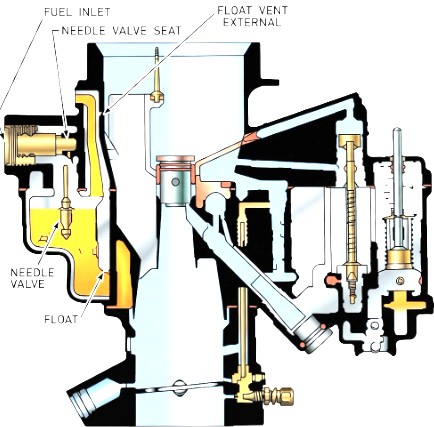
With the throttle valves closed and the engine running at slow idle speed, fuel from the float chambers is metered into the idle tubes via engine vacuum, through an orifice at the base of each idle tube, see the illustrations above. The air taken in through the idle air bleed holes mixes with the fuel at the top of the idle tubes.
This mixture of air and fuel then flows down the channels where it is mixed with additional air entering through the secondary idle air bleeds. The mixture is then discharged at the lower idle discharge holes. The quantity of fuel discharged is controlled by adjustable idle needle valves. As the throttle valves are opened
slightly, the upper idle hole discharges extra fuel to transfer from idle to accelerating. This can cause some hesitation just off idle so be sure this passage is open.
Inspect the idle mixture screw for any grooves or bending. Previous persons may have tightened the screw with too much force and damage the screw.
Adjusting Idle Mixture
Adjusting the idle mixture on a Stromberg AAV (commonly found on 1940s and 50s Buicks, Packards, and Cadillacs) is a straightforward process, but it requires the engine to be at operating temperature first.
The AAV is a two-barrel carburetor, meaning it has two idle mixture screws located at the base of the throttle body (one for each barrel).
1. Preparation
-
Warm up the engine: Drive the car or let it run until it reaches normal operating temperature.
-
Check the choke: Ensure the choke valve is fully open.
-
Set Initial Idle Speed: Use the throttle stop screw (on the linkage) to set the idle to the manufacturer's specification (usually around 450–500 RPM for these vintage engines).
2. The Adjustment Procedure
The goal is to find the "lean best" idle—the point where the engine runs smoothest with the least amount of fuel.
-
Baseline Setting: If you are starting from scratch (e.g., after a rebuild), gently turn both screws clockwise until they seat (do not force them!), then back them out 1.5 to 2 turns.
-
Adjust One Side: Turn one idle mixture screw in (clockwise) slowly 1/4 of a turn until the engine begins to stumble or the RPM drops. Allow the engine to catch up. May take a second.
-
Back it Out: Slowly turn that same screw out (counter-clockwise) until the engine reaches its highest, smoothest RPM.
-
Tip: If you have a vacuum gauge connected to the intake manifold, adjust the screw to achieve the highest steady vacuum reading.
-
-
Repeat for the Other Side: Perform the same steps for the second screw. Since the barrels share a common plenum, adjusting one may slightly change the requirements for the other.
-
Balance: Go back and forth between the two screws one more time to "fine-tune" them. They should ended up at roughly the same number of turns out.
3. Final Calibration
-
Reset Idle Speed: After finding the best mixture, your RPM might have increased. Use the throttle stop screw to bring the idle back down to your target RPM.
-
The "Lean Drop": Some mechanics prefer to turn the screws back in just a tiny bit (about 1/8th of a turn) after finding the peak RPM to ensure the car isn't running unnecessarily rich.
