
Rochester AA Carburetor Tech: Understanding the Float System
The float system in the Rochester AA two-barrel carburetor features a highly efficient, advanced design for its era. Understanding how these components interact is key to maintaining a stable fuel level, preventing flooding, and ensuring smooth performance under all road conditions.
Core Component Identification
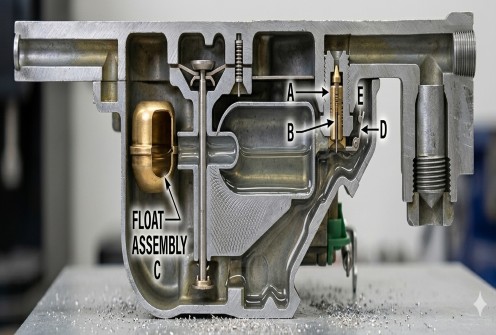
The Rochester AA float system relies on five primary components working in unison within the fuel bowl reservoir:
-
Float Needle Seat & Gasket ("A"): The threaded brass seat and sealing gasket that controls fuel entry into the bowl.
-
Needle Valve ("B"): The precision valve that slides within the seat to open or block fuel flow based on fuel level.
-
Float Assembly ("C"): The dual-pontoon brass float unit that rises and falls with the fuel level.
-
Float Tang ("D"): The integrated metal extension on the float arm that contacts the balance spring.
-
Balance Spring ("E"): A specialized spring that remains in constant contact with the float tang.
How it Works: The Role of the Balance Spring
Unlike standard vintage carburetors that rely solely on the buoyancy of a massive float, the Rochester AA utilizes a unique Balance Spring ("E") design. This design serves two critical functions:
-
Vibration Dampening: The constant tension between the Float Tang ("D") and the Balance Spring ("E") acts as a shock absorber. This prevents the needle valve from constant bouncing and vibrating against the seat during rough road conditions, significantly reducing premature needle wear and keeping the fuel level perfectly steady.
-
Increased Efficiency: Because the spring assists in stabilizing and balancing the assembly, the carburetor can utilize a smaller, more efficient float unit without sacrificing precise fuel level management.
Tech Tip: When rebuilding a Rochester AA, always inspect the balance spring for distortion or loss of tension. If the spring is bent or missing, the float will bounce excessively, leading to irregular fuel levels, fuel sloshing, and potential flooding issues under normal driving conditions.
Rebuild & Bench Adjustments
When overhauling the fuel bowl reservoir, pay close attention to the relationship between the tang and the balance spring.
-
Check for Wear: Inspect the tip of the needle valve and the contact point on the float tang for any deep ridges or pitting caused by years of operation.
-
Alignment: Ensure the float assembly moves freely on its hinge pin without binding, and verify that the float tang maintains square, center contact with the balance spring throughout its full range of travel.
Rochester AA Float Adjustment
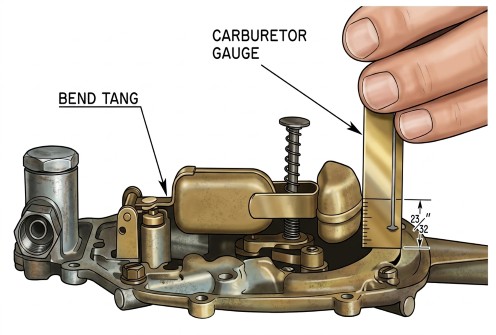
Before adjusting, ensure the float axle pin is straight and the brass pontoon is not loaded with trapped raw fuel (shake the float to check for leaks).
Place the carburetor air horn (bowl cover) completely upside down on a clean workbench. Always remove the bowl cover gasket before taking measurements to ensure an accurate reading against the true machined metal surface.
Allow the float to rest on the needle valve under its own weight. Ensure the Float Tang ("D") is making square, centered contact with the Balance Spring ("E") and that the assembly moves freely without binding against the sides of the housing.
Using a precision t-scale or depth gauge, measure the vertical distance from the machined face of the cover down to the top of the soldered seam at the very front edge of the float pontoon.
If the measurement is not exactly 23/32", carefully bend the float arm to adjust. Important: Only bend the horizontal float arm near the hinge pin structure. Never apply pressure or bend the metal at the front of the float or directly on the pontoons themselves.
