
Rochester 4G Carburetor Rebuild Guide
The Rochester 4G and 4GC carburetors were widely used in GM vehicles during the 1950s and 1960s. Rebuilding one correctly requires careful disassembly, cleaning, inspection, and reassembly to ensure reliable performance. Below is a step-by-step overview drawn from the Rochester service manual4G Rebuild Manual
Disassembly
-
Mounting and Preparation
-
Secure the carburetor on a holding fixture.
-
Remove the fuel inlet fitting, filter, and gasket.
-
-
Choke System
-
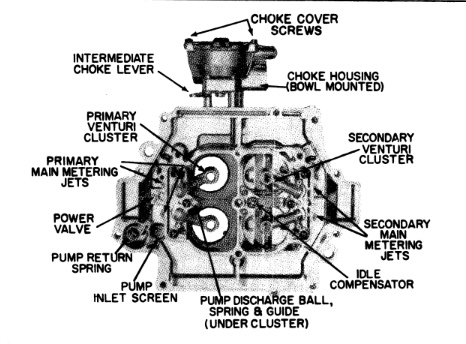
Remove choke cover, gasket, and baffle plate.
-
Detach choke trip lever, fast idle cam, and choke rod.
-
Remove choke housing and gasket if mounted on the air horn.
-
-
Pump Rod and Lever
-
Detach pump rod retaining clips.
-
Remove pump lever shaft and plunger assembly.
-
-
Air Horn
-
Remove 13 attaching screws and lift air horn straight up.
-
Remove floats, hinge pins, and matched needle/seat assemblies (keep primary and secondary parts separate).
-
Remove the power piston, spring, and pump plunger.
-
-
Float Bowl
-
Remove venturi clusters and gaskets (primary and secondary).
-
Remove main metering jets and power valve.
-
Remove pump discharge check ball, spring, and “T” retainer.
-
-
Throttle Body
-
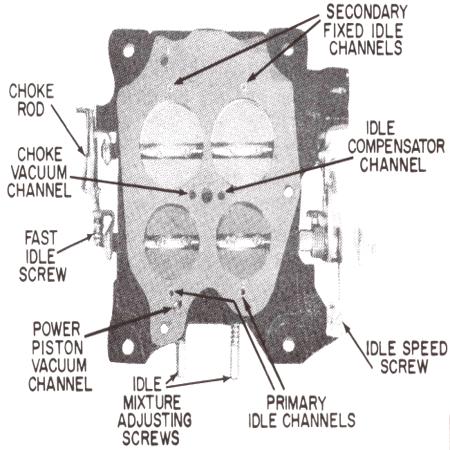
Remove throttle body attaching screws and gasket.
-
Do not attempt to remove throttle valves or shafts unless replacing the entire throttle body.
-
Cleaning
-
Use a cold immersion type cleaner for castings and metal parts.
-
Do not immerse rubber, plastic, diaphragms, or pump plungers in strong solvent—use Stoddard solvent (mineral spirits).
-
Blow out all passages with compressed air.
-
Never push drills or wires through jets; instead, flush and check with spray and air pressure<4G Rebuild Manual.
Inspection
-
Floats – Check for dents, leaks, and wear at hinge pins.
-
Needle & Seat – Replace only as matched sets.
-
Pump Plunger – Inspect for wear, cracks, or hardened material. Replace if faulty.
-
Throttle Shaft & Lever – Check for excessive play or worn holes that can cause vacuum leaks.
-
Gaskets & Seals – Always replace with new parts from a rebuild kit.
-
Governor (if equipped) – Inspect diaphragm for cracks, leaks, or improper spring tension.
Assembly
-
Throttle Body
-
Install idle mixture screws finger-tight, then back out 1½ turns as a starting point.
-
Attach throttle body to float bowl with new gasket and torque screws to spec.
-
-
Float Bowl & Venturi
-
Install power valve and jets.
-
Install venturi clusters with new gaskets.
-
Replace check balls, springs, and retainers as required.
-
-
Air Horn
-
Install floats, matched needle/seat assemblies, and float balance spring.
-
Adjust float level to manual specifications.
-
Install pump plunger, lever, and spring.
-
Refit choke shaft, piston, and cover.
-
-
Final Steps
-
Attach pump rod and clips.
-
Install choke cover, gasket, and coil.
-
Refit fuel inlet filter, spring, and fitting.
-
Adjust choke, pump rod, and idle per the service manual.
-
Conclusion
The Rochester 4G carburetor is robust but depends heavily on precision during rebuilding. Proper cleaning, careful handling of matched needle and seat assemblies, and correct float adjustment are essential to restoring performance. Always verify idle mixture, choke operation, and accelerator pump discharge before reinstalling on the engine
