The Mikuni carburetor, like many carburetors, uses a float circuit as part of its fuel delivery system. Here's a basic explanation of how it works in English:
-
Fuel Reservoir: The float circuit includes a chamber or bowl that acts as a reservoir for fuel. This reservoir is connected to the fuel supply from the tank.
-
Float and Needle Valve: Inside the reservoir is a float, which is usually made of plastic or metal. This float is connected to a needle valve. As the level of fuel in the bowl rises, the float rises too.
-
Fuel Level Regulation: The rising float lifts the needle valve into a seat, gradually closing off the fuel supply from the tank. This mechanism is crucial for maintaining a consistent level of fuel in the bowl. If the fuel level gets too high, the float rises and closes the valve more, reducing the flow of fuel into the bowl. Conversely, as the engine consumes fuel and the level in the bowl drops, the float descends, opening the valve and allowing more fuel to flow in.

-
Fuel Delivery to the Engine: The fuel in the bowl is then drawn into the engine through various jets and passages in the carburetor during operation. The amount of fuel drawn depends on the engine's demands, which are controlled by the throttle and other adjustments.
-
Air-Fuel Mixture: The carburetor's main function is to mix the fuel with air in the correct ratio for combustion in the engine. The float circuit ensures that there is always a consistent supply of fuel available for this mixing process.
-
Engine Speed and Load Response: As the engine speed and load change, the demand for fuel changes. The carburetor adjusts the fuel flow accordingly, and the float circuit plays a key role in ensuring that these adjustments are smooth and consistent.
In summary, the float circuit in a Mikuni carburetor is responsible for maintaining a constant level of fuel in the bowl, ensuring that the carburetor can deliver the right amount of fuel to the engine under various operating conditions. This is essential for the engine's performance, efficiency, and reliability.
How To Adjust the Mikuni Float
- Based on 1983 Chrysler application.
- Turn the air horn assembly upside down.
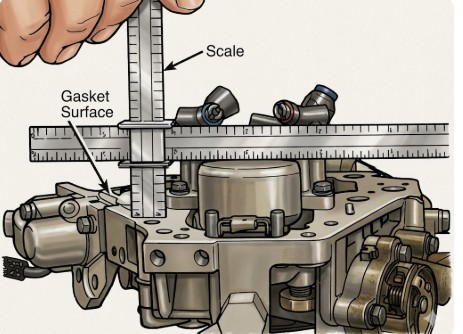
- Without the gasket, allow the weight of float to seat inlet valve. (do no put any pressure on the needle)
- From top of air horn, remove primary and secondary air bleed jets. Note the location of each jet. They must go back the same.
- Measure the distance between the bottom edge of float to the surface of air horn. Adjust to .78" by adding or removing shims under the needle & seat.