
Here’s how to adjust the float on a Carter Ball & Ball (B&B) carburetor, step-by-step.
1. Preparation
-
Remove the carburetor top (air horn) so the float is visible.
-
Work in a clean area to avoid getting dirt into the carburetor.
-
Have a small ruler or machinist’s scale handy (usually measurements are in 32nds of an inch).
-
Check your specific model’s float setting spec — it’s usually stamped in the rebuild kit instructions or factory manual.
2. Float Level Adjustment
-
Invert the air horn (float up, needle seated).
-
Measure from the gasket surface (with the gasket removed unless the spec says otherwise) to the highest point of the float.
-
On most Carter B&B carbs, this measurement is in the range of 5/64" to 3/16" depending on model — always verify the spec.
-
-
To adjust:
-
Bend the small tab on the float arm that contacts the needle to raise or lower the float.
Important: Any pressure on the needle may damage the needle causing a flooding situation.-
Bend tab down ? raises float ? more fuel in bowl.
-
Bend tab up ? lowers float ? less fuel in bowl.
-
-
-
Recheck the measurement after each bend — small changes make a big difference.
3. Float Drop Adjustment
-
Hold the air horn upright (float hanging down).
-
Measure from gasket surface to the lowest point of the float.
-
Adjust by bending the secondary stop tab on the float arm.
-
This controls how far the float drops when the bowl is low, ensuring the needle doesn’t jam or pull out too far.
-
4. Final Checks
-
Make sure float is level side-to-side — if it’s tilted, it can hit the bowl wall.
-
Inspect for saturated floats (if brass, check for leaks; if nitrophyl, check for swelling).
-
After reassembly, check for proper fuel shut-off by applying gentle air pressure to the inlet with the float in the closed position — no leakage should occur.
Here’s a clear, exploded-style diagram of a Carter Ball & Ball (B&B) carburetor's float assembly—pinpointing the components you’ll need to work with. Though it’s not explicitly labeled here, I’ll walk you through what to look for and how to identify the parts: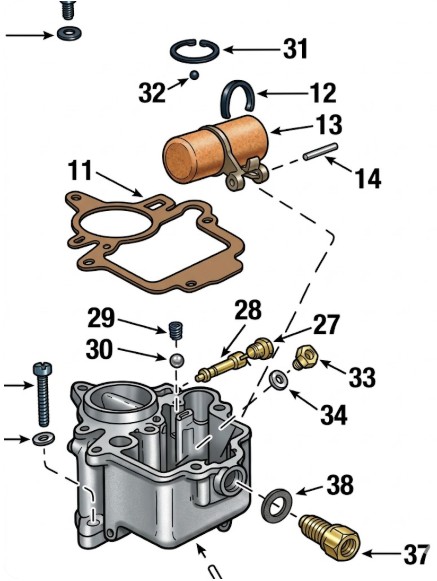
What You’re Looking At
From the image:
-
Part #13 — the Float Assembly
-
Float Pin & Retainer — the small pin (and its spring retainer, listed nearby in most diagrams) that secures the float to the lever (12)
-
Needle & Seat — the part the float controls to open and close fuel flow
These are the key components involved when adjusting the float level.
How to Interpret the Diagram
Even though the diagram doesn’t label parts by name, it gives you the structural layout and assembly orientation you need. You’ll see how the float, pin, and needle are positioned relative to the bowl cover and body — important for understanding how to measure and adjust float height accurately.
Quick Identification in Your Carb:
| Component | What to Look For |
|---|---|
| Float (13) | A hollow, usually brass or nitrophyl piece that pivots on a pin |
| Float Pin | A small horizontal pin where the float attaches via a hinge |
| Retainer/Spring | (12) Keeps the float pinned down—often a small clip or spring washer |
| Needle & Seat | (37) Connected to the float; controls fuel inlet depending on float level |

