
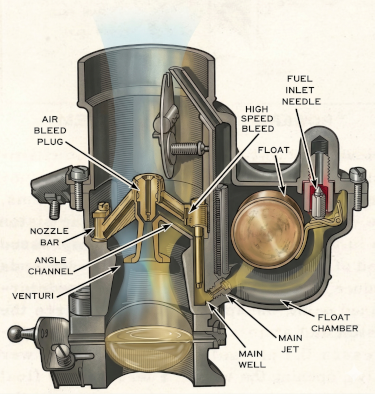
The Holley 847 float system is a fundamental fuel metering design used in early single-barrel Holley carburetors, particularly in the 1930s–1950s. The system is responsible for regulating fuel flow into the float bowl and ensuring a consistent fuel level, which is essential for proper fuel delivery to the engine.
Breakdown of the Holley 847 Float System (Referencing the Diagram)
1. Fuel Inlet Needle & Seat
Fuel enters the carburetor through the fuel inlet needle, which is connected to the float. As the float rises with the fuel level, it pushes the needle into its seat, stopping the flow of fuel to prevent overflow.
2. Float
The float rests on the surface of the fuel in the float chamber. As fuel enters, the float rises. When it reaches the set float level, it closes the inlet needle, maintaining a constant fuel height. This level is critical to ensure stable metering through the jets and main well.
3. Float Chamber
Also called the fuel bowl, this reservoir stores the fuel regulated by the float and needle. It supplies fuel to the main jet and main well.
4. Main Jet
Located at the bottom of the float chamber, the main jet meters the flow of fuel into the main well. Its size determines how much fuel can pass through under varying throttle and vacuum conditions.
5. Main Well
This vertical passage holds fuel and allows it to rise into the nozzle via pressure drop from airflow across the venturi. The fuel here is prepped to be mixed with air.
6. High Speed Bleed / Air Bleed Plug
These components allow air to mix with the fuel in the main well to emulsify the mixture. Emulsified fuel atomizes better as it enters the intake, improving combustion efficiency at higher speeds and loads.
7. Nozzle Bar & Angle Channel
The fuel/air mixture travels through the angle channel, up the nozzle bar, and exits into the venturi, where it’s pulled into the engine due to vacuum and pressure drop. The venturi’s shape helps atomize the fuel for better combustion.
How It Works — Step-by-Step
-
Fuel flows in through the inlet needle.
-
The float rises and shuts off the inlet once the proper level is reached.
-
Fuel sits in the float chamber until engine vacuum pulls it through the main jet.
-
It rises up the main well, mixes with air from the high-speed bleed.
-
It then travels through the angle channel and nozzle bar.
-
Finally, it discharges into the venturi, ready to be burned by the engine.
Why It Matters
A properly functioning Holley 847 float system is essential for:
-
Fuel level stability
-
Accurate air/fuel mixture
-
Smooth acceleration
-
Reliable cold and hot starts
Float issues (like sticking or incorrect height) can cause flooding, lean conditions, or rough running.
Let me know if you'd like a float adjustment guide or troubleshooting checklist for the 847 carburetor.
How To Adjust the Holley 847 Float?
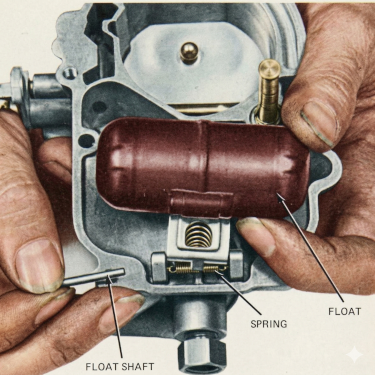
Here’s a no-nonsense, step-by-step guide to adjusting the float level on a Holley 847 carburetor:
Tools You’ll Need:
-
Float level gauge tool (Holley tool #26-25 or a caliper/ruler)
-
Small screwdriver or needle-nose pliers
-
Clean workspace
-
Carburetor service manual (optional but helpful)
Steps to Adjust Holley 847 Float Level:
-
Remove the Float Bowl
-
Carefully unscrew and remove the bowl at the bottom of the carburetor.
-
Be gentle; avoid damaging the gasket.
-
-
Inspect the Float and Needle Valve
-
Check the float for damage or fuel inside it (it should be hollow).
-
Make sure the needle valve moves freely and seats properly.
-
-
Position the Carburetor
-
Hold the carburetor so the float hangs naturally — typically upside down as if installed on the engine.
-
This simulates the fuel level during operation.
-
-
Measure the Float Level
-
Using the Holley float level gauge or a precise caliper, measure the distance from the gasket surface (where the bowl seats) to the top of the float tab (the point where it contacts the needle).
-
For Holley 847, the float level specification is typically around 5/8 inch (0.625”).
-
Check your specific carb model manual to confirm exact specs.
-
-
Adjust the Float Level
-
If the float drop is too short (float sits too high), gently bend the small tab on the float arm downward to increase the drop.
-
If the float drop is too long (float sits too low), bend the tab upward slightly to decrease the drop.
-
Small bends make big differences — go slow.
-
-
Recheck Measurement
-
After bending, re-measure float drop to make sure it’s within spec.
-
Repeat adjustment as needed.
-
-
Check Float Height (Optional)
-
Some recommend also checking float height with the bowl installed and the carburetor level on a flat surface.
-
This can vary based on Holley model, but float drop is the primary measurement for the 847.
-
-
Reinstall the Float Bowl
-
Once adjusted, reinstall the bowl carefully with a clean gasket.
-
Make sure no dirt or debris is inside.
-
-
Test for Leaks and Performance
-
After installation, run the engine and check for flooding, fuel leaks, or poor idle — signs the float level is off.
-
Quick Tips:
-
Never force the float tab or needle valve; they’re delicate parts.
-
If the float is cracked or filled with fuel, replace it.
-
Always use the correct specification for your exact Holley 847 carburetor; some slight variations exist depending on production year or application.
Does the Holley 847 Need a Clip From the Float to The Needle?
No, the Holley 847 carburetor does not need a clip from the float to the needle.
Here’s why:
The float in a Holley 847 hangs upside down, as does the needle valve. This design means the needle automatically drops when the float drops. The only time this might not happen is if the needle sticks due to ethanol buildup or other contaminants, in which case the needle should be replaced.
The needle valve has a tapered tip that seals against the seat to stop fuel flow. The float arm pushes the needle into or away from the seat depending on the fuel level.
There is no separate clip attaching the float to the needle valve; the mechanical connection is part of the float arm and needle assembly.
If you see a clip on some carburetors, it’s usually for different designs or aftermarket parts—not the standard Holley 847.
Bottom line: The Holley 847 relies on a simple float arm and needle valve setup without any clip connecting the two.
Additional Notes and Common Issues
While the Holley 847’s design is straightforward and reliable, there are a few points to watch for to keep your carburetor functioning properly:
-
Needle Sticking and Fuel Leakage
Over time, especially with ethanol-blended fuels, deposits and varnish can build up on the needle valve, causing it to stick. This prevents the needle from sealing properly, leading to fuel flooding or leaks. If you notice fuel overflowing or leaking near the float bowl, the needle valve is a prime suspect and should be inspected and likely replaced. -
Float Condition and Adjustment
Since the float directly controls the needle valve’s operation, a damaged or saturated float (for example, one that’s absorbed fuel if it’s made of cork or other porous material) will affect fuel level regulation. Make sure the float is intact, not cracked or fuel-logged, and properly adjusted to the correct height according to your carburetor specs. -
No Clip Means Simplicity But Also Vulnerability
The lack of a clip simplifies the mechanism, reducing parts and potential failure points. However, it also means the float arm and needle must be in good condition with proper clearance and movement. Bent float arms or damaged needle seats can cause issues that won’t be fixed by adding clips or other hardware. -
Cleaning and Maintenance
Regular cleaning of the float bowl, needle valve, and seat area will prevent most sticking issues. Use carburetor cleaner and carefully inspect these components during rebuilds or troubleshooting.
Summary
The Holley 847 carburetor’s float and needle valve system is simple by design, eliminating the need for a clip. This design relies on gravity and precise mechanical interaction to regulate fuel flow efficiently. Keeping the needle valve clean and the float in good shape is key to avoiding flooding or fuel starvation issues.
If problems persist, replace the needle valve and check the float height adjustment before considering more complex repairs.
