
Since the Holley 4165 is a spread-bore "Double Pumper," it features mechanical secondaries and external float adjustments. This makes it much easier to tune than models that require removing the fuel bowls.
Here is the step-by-step process to get your fuel levels dialed in safely.
1. Preparation & Safety
-
Warm the engine: The engine should be at operating temperature so the choke is fully open and the high-idle cam is disengaged.
-
Level the vehicle: Ensure the car is on a flat surface so the fuel level in the bowls is accurate.
-
Have a rag ready: You will be opening "sight plugs," and a small amount of fuel may spill.
2. Check the Current Fuel Level
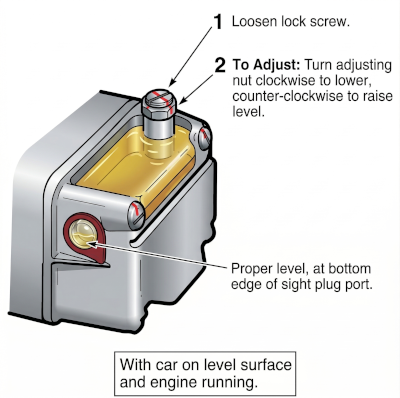
The 4165 has two fuel bowls (Primary and Secondary). You must adjust them individually.
-
Locate the sight plug on the side of the fuel bowl.
-
With the engine idling, carefully remove the plug.
-
The Goal: The fuel should be right at the bottom edge of the sight plug hole. It should just barely "trickle" out if you gently rock the car.
-
Too Low: No fuel visible.
-
Too High: Fuel pours out of the hole (Fire hazard—shut off the engine immediately).
-
3. Make the Adjustment
On top of the fuel bowl, you will see a large slotted screw sitting on top of a hex nut.
-
Loosen the lock screw: Use a large flat-head screwdriver to loosen the screw just enough to allow the hex nut to turn.
-
Turn the Adjusting Nut (5/8" wrench):
-
To Lower the float: Turn the nut clockwise (down).
-
To Raise the float: Turn the nut counter-clockwise (up).
-
Rule of thumb: 1/6 of a turn equals approximately 1/16" of fuel level change.
-
-
Clear the bowl: If you lowered the float, you must rev the engine slightly to "consume" the excess fuel in the bowl before checking the level again.
4. Lock it Down
-
Once the fuel is at the bottom of the sight hole, hold the hex nut steady with your wrench.
-
Tighten the lock screw firmly.
-
Reinstall the sight plug.
