
Rebuilding the Zenith 94 Carburetor
Disassembly and Jet Removal
-
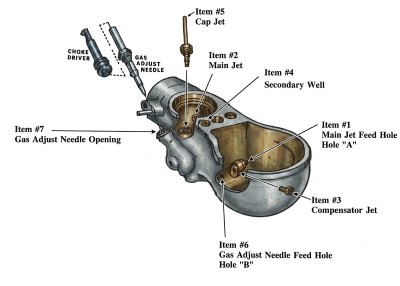
Separate the Body: Drain the carburetor and separate the upper housing from the lower body shown in the diagram.
-
Remove Adjusters: Carefully unscrew and remove the Gas Adjust Needle and the Choke Driver assembly from the Gas Adjust Needle Opening (Item #7). Inspect the needle tip for scoring or grooving.
-
Extract the Jets: Using properly sized, hollow-ground screwdrivers (to avoid stripping the soft brass slots), carefully remove the following jets:
-
Main Jet (Item #2) located in the bottom center of the bowl.
-
Cap Jet (Item #5) which sits tall alongside the main jet.
-
Compensator Jet (Item #3) located on the side of the bowl.
-
-
Remove Secondary Well: If your model allows, carefully extract the Secondary Well (Item #4). In some Zenith models, this is pressed in, so do not force it if it does not have removal slots.
NOTE: IF PARTS ARE FROZEN TRY APPLYING HEAT TO THE OUTSIDE.
Cleaning and Passage Inspection
Proper flow through the internal passages is the most critical part of this rebuild. Even a speck of rust can cause lean running conditions.
-
Soak the Body: Submerge the stripped lower body in carburetor dip or an ultrasonic cleaner to break down stubborn fuel varnish. We use Chem Dip found in most parts stores.
-
Clear the Feed Holes: Using carburetor cleaner and compressed air, blow out the internal passages. Pay special attention to:
-
Main Jet Feed Hole / Hole "A" (Item #1): Ensure steady airflow goes from this passage directly to the Main Jet cavity.
-
Gas Adjust Needle Feed Hole / Hole "B" (Item #6): Verify this passage is completely clear so fuel can properly feed the compensator circuit.
-
-
Clean the Jets: Soak and blow out the Main, Cap, and Compensator jets. Never use steel wire or drill bits to clear jet orifices, as this will enlarge the holes and ruin the fuel calibration. Use copper wire if physical probing is absolutely necessary.
Reassembly
-
Install the Jets: Thread the cleaned or new Main Jet (Item #2), Compensator Jet (Item #3), and Cap Jet (Item #5) back into their respective ports. Seat them snugly so they seal on their machined shoulders, but do not overtighten, as brass threads will easily strip.
-
Reinsert the Well: Reinstall the Secondary Well (Item #4) if it was removed.
-
Install the Adjuster: Thread the Gas Adjust Needle and Choke Driver back into the Gas Adjust Needle Opening (Item #7). Gently seat the needle lightly against the bottom, then back it out about one full turn as a baseline for starting the engine.
-
Final Assembly: Mate the lower body back to the upper housing using a fresh gasket, ensuring the float is properly adjusted before sealing it up.
