
 Understanding the Carter BBD Accelerator Pump Circuit: Function, Troubleshooting, and Maintenance
The Carter BBD 2-barrel carburetor is renowned for its reliability in classic vehicles. A crucial component of its performance is the accelerator pump circuit, which ensures smooth acceleration by delivering an extra fuel shot when the throttle is engaged.
How the Carter BBD Accelerator Pump Works
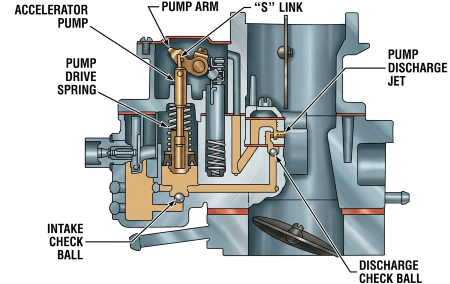
When the throttle is opened, the accelerator pump plunger descends, pushing fuel through the discharge check valve into the carburetor's venturi. This immediate fuel delivery prevents hesitation or stalling during acceleration. As the throttle closes, the plunger ascends, drawing fuel into the pump chamber through the intake check valve, preparing for the next acceleration.
Key components include:
Pump Plunger: Drives fuel into the venturi upon throttle engagement.
Intake Check Valve: Allows fuel to enter the pump chamber during plunger ascent.
Discharge Check Valve: Prevents backflow and ensures fuel is directed into the venturi.
Air Bleed: Prevents fuel dribble when the pump is inactive by relieving pressure.
Common Accelerator Pump Issues and Solutions
1. Hesitation or Stumble During Acceleration
Symptoms: Engine hesitates or stumbles when the throttle is quickly engaged.
Potential Causes:
Dried or Damaged Pump Cup: Over time, the pump cup can harden or crack, reducing its sealing ability.
Clogged Passages: Debris or varnish can obstruct fuel flow within the accelerator pump circuit.
Worn Check Valves: Faulty intake or discharge check valves can impede proper fuel delivery.
Solutions:
Inspect and replace the pump cup if it's hardened or damaged.
Clean all passages with carburetor cleaner and compressed air to remove obstructions.
Examine check valves for wear or debris and replace if necessary.
2. Fuel Dribble at Idle
Symptoms: Fuel leaks into the venturi when the engine is idling, leading to a rich mixture.
Potential Causes:
Faulty Discharge Check Valve: Allows fuel to leak into the venturi when not under pressure.
Missing or Damaged Air Bleed: Fails to relieve pressure, causing fuel to dribble.
Solutions:
Replace the discharge check valve to ensure it seals properly.
Ensure the air bleed is present and unobstructed to prevent pressure buildup.carburetor-parts.com
Maintenance Tips for Optimal Performance
Regular Inspection: Periodically check the accelerator pump components for wear or damage.
Use Quality Fuel: Ethanol-blended fuels can degrade rubber components; consider using ethanol-free fuel when possible.
Proper Storage: If the vehicle is stored for extended periods, run the engine periodically to keep components lubricated and prevent drying out.
The lag can be caused by the distributor advance not working correctly.
A lean condition could cause a lag including popping through the carburetor.
A rich condition could cause a lag.
With those conditions out of the way lets see about the accelerator pump circuit.
Has the vehicle been sitting for a long time? This might cause the check balls, inlet and outlet to get varnished up causing them to stick. The passage itself could be varnished and plugged.
Testing the Accelerator Pump
- Back the idle screw out so it is not touching the fast idle cam.
- Open the choke valve to get the throttle valve to close.
- Install the throttle connector rod in the outer hole of the throttle lever and the inner hole of the pump arm.
- The B distance is 1" from the top of the float bowl cover to the top of the plunger shaft.
- Adjust by bending the connector rod as illustrated.
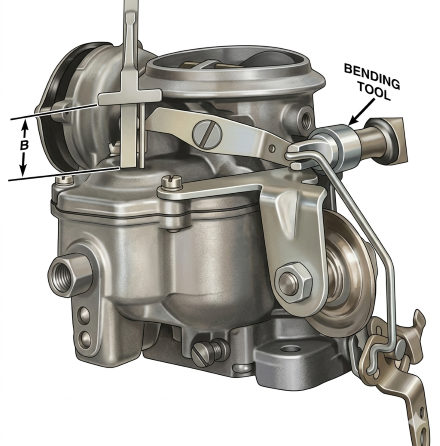
- Remove cover plate on top of air horn. Back off curb idle speed screw to fully close throttle valve. Fast idle cam must be in open choke position
- Now turn carb idle screw clockwise until it just touches top. Continue two more turns
- On Dodge/Plymouth models, be sure accelerator pump "S" link is in OUTER hole of pump arb if arm has 2 holes
- Measure distance between surface of air horn and top of accelerator pump shaft. If adjustment is needed, loosen pump arm adjusting lock screw and turn sleeve to adjust pump travel. When correct measurement is obtained, tighten lock screw.
- Install step-up piston cover plate and gasket
