
Carter YF Metering Rod Adjustment – Step-by-Step Instructions
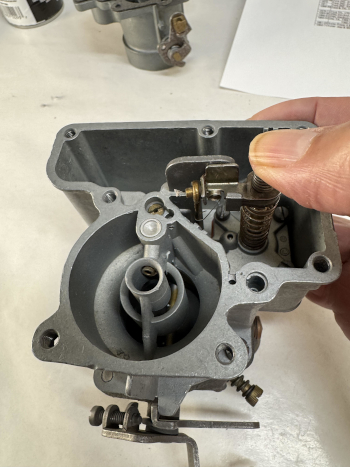
The metering rod controls fuel flow through the main jet based on engine vacuum and throttle position. Here's how to properly adjust it:
Tools Needed:
Flathead screwdriver
Needle-nose pliers (for adjustments)
Good lighting for visibility
Adjustment Procedure:
1. Close the Throttle Valve
Make sure the throttle valve is fully closed (seated in the bore). This sets the correct reference position for the adjustment.
2. Press Down the Diaphragm Shaft
Push down on the upper end of the diaphragm shaft (the one connected to the vacuum piston/diaphragm) until it bottoms out in the vacuum chamber. This simulates full vacuum, such as at idle or light load.
3. Check the Metering Rod Position
With the diaphragm shaft fully pressed down:
The metering rod should be fully seated (touching the bottom) inside the metering rod well.
The metering arm (the arm the rod is attached to) should be in contact with the lifter link — specifically:
At the outer end of the lifter link (the side nearest the return springs and the support lug on the carburetor body).
4. Adjust If Necessary
If the metering rod is not fully seated or the metering arm isn’t contacting the lifter link properly:
Bend the lip of the metering rod arm (the small tab where the rod attaches):
Bend upward to raise the metering rod.
Bend downward to lower the metering rod.
Use small, precise adjustments and re-check the fit each time.
Final Check
Recheck the contact between the metering arm and lifter link.
Ensure the metering rod fully seats when the diaphragm is depressed.
Open and close the throttle and verify smooth operation.


Why Carter YF Float Level Matters
The float level in a Carter YF carburetor plays a critical role in controlling the amount of fuel delivered to your engine. It acts as a gatekeeper for fuel entering the carburetor bowl, and maintaining the correct float height ensures the engine receives the proper air-fuel mixture.
Key Reasons the Float Level Is Important:
Fuel Control:
The float regulates the fuel supply by opening or closing the needle valve based on the fuel level in the bowl. If the float is too high, it allows excess fuel, causing flooding. If it's too low, it can restrict fuel, leading to lean conditions.Engine Performance:
Incorrect float level can result in poor throttle response, rough idling, hesitation, or even stalling. A properly adjusted float helps maintain smooth acceleration and consistent fuel delivery across all engine speeds.Cold Start Functionality:
During cold starts, especially with a choke engaged, the float must deliver fuel accurately to allow fast idle and proper warm-up. If float level is off, cold start behavior can suffer.Fuel Efficiency:
A float set too high causes over-fueling, which can reduce gas mileage and foul spark plugs. A float set too low may lead to power loss and misfires under load.Carburetor Health:
Running too rich or too lean over time can cause long-term wear on your engine and carburetor. Keeping the float properly adjusted extends the life of both.
How to Measure Float Level
- Remove the top of the Carter YF carburetor.
- Hold the air horn upside down so the float rests on the needle.
- Measure from the gasket surface to the highest point on the float using a float gauge or ruler.
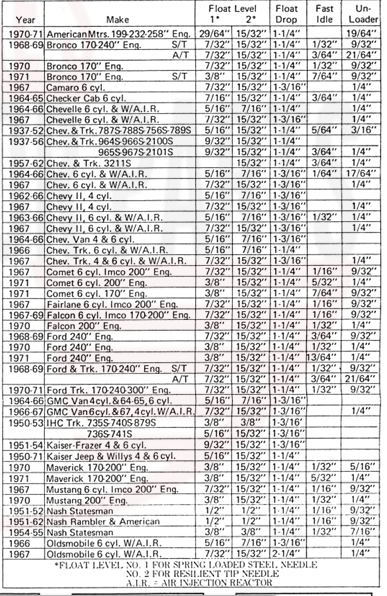
- Compare the measurement to the factory specification (e.g., 5/64" or 9/32", depending on model). It also matters as to which needle you have, solid, or spring loaded.
- Adjust by carefully bending the float tab.
Correct Float Level Specifications
Common Symptoms of Incorrect Float Level
A float that is set too high may cause flooding, while one set too low can lead to fuel starvation. Both conditions impact engine performance and drivability.Troubleshooting Tips
1. Engine Floods or Smells Rich
Possible Causes:
Float set too high
Sticking needle and seat
Float saturated with fuel (leaking brass float)
Troubleshooting Steps:
Remove the carb top and inspect float height using a ruler or float gauge.
Check if the float is rubbing or binding on the bowl walls.
Shake the float gently; if you hear fuel sloshing inside, replace it.
Clean or replace the needle and seat assembly if it's sticking.
2. Engine Starves for Fuel or Hesitates Under Load
Possible Causes:
- Accelerator pump circuit problem
Float set too low
Float drop limited by incorrect tab adjustment
Debris in needle and seat
Troubleshooting Steps:
Measure the float level; compare with spec (commonly 5/64" to 9/32" depending on model).
Adjust float tab to allow proper drop and refilling.
Check for dirt or sediment restricting fuel flow into the bowl.
3. Inconsistent Idle or Surging
Possible Causes:
Float level fluctuating due to worn hinge pin
Gasket surface warped causing float misalignment
Troubleshooting Steps:
Inspect the float pivot pin for wear or excessive play.
Ensure float is parallel to the air horn gasket surface when inverted.
Replace the float or top cover if warping or misalignment is visible.
4. Fuel Leaking from Vent or Throttle Shaft
Possible Causes:
Overfilled bowl due to stuck float
Improper float setting or needle not seating
Troubleshooting Steps:
Verify float height and drop.
Ensure the float isn’t binding.
Replace the needle and seat if leaking persists.
Pro Tip:
Always re-check float height after installing a new needle and seat. A small change in seat depth can affect the float setting, even if the float wasn't altered.
Need Replacement Parts?
Brass Float
Needle & Seat Kit
Float Gauge
Carter YF Rebuild Kit
Shop high-quality, ethanol-resistant parts at:
https://www.carburetor-parts.com/carter-yf-carburetor-parts
Other Types of YF Floats. Some are YFA.


Carter YFA Float Drop
 1981-85 Float Drop: 1 19/32"
- Check the float drop. If the float isn't dropping, then the needle will not be pulled out of the seat and the float bowl will not fill up.
- Look at the tip of the needle. If any pressure was put on the needle when adjusting the float, then the needle may be damaged not allowing it to open.
- Test the fuel pump pressure. 4-5 lbs should do it.
- Did you replace the fuel filter(s).
Older YF Float Adjustment

