
Flooding
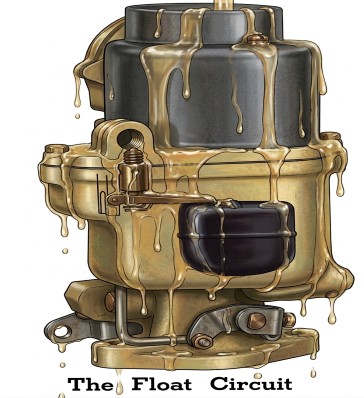
Heat soak and/or percolation can occur when the engine gets hot and comes to a idle, or off status. The fuel then boils causing it to flood over the top, or perhaps evaporate quickly.
Flooding occurs when too much fuel in getting into the float bowl and floods over the top.
Both conditions above can cause fuel to run out of the throttle shaft. This doesn't mean the shaft is loose, it is just an easy place for the fuel to run out.
What can cause the flooding:
- The float is filling up with fuel. Heat up some water just prior to boiling and immerse the float. Any leaks will show up with bubbles.
- We do carry new brass floats for the W-1

- Is the viton tip damaged. Look for any scoring. These are easily damaged when pressure is put on the needle while adjusting the float.
- Check the float adjustment, both float level and float drop.
- Did the old gasket under the seat get completely removed. We have seen these get crusted over to where it looks like the carburetor itself.
- Make sure the gasket isn't cracked.
- Look for any cracks around the seat.
- Test your fuel pump. Should be around 2 lbs, but verify this with your motors manual.
Hard to Start
A hard-starting Carter W-1 usually comes down to one of three things: the carburetor is losing its pump prime, the choke isn't functioning correctly, or modern fuel characteristics are causing the bowl to run dry or flood.
To help isolate exactly what's failing, you can run through this interactive diagnostic tree based on your specific symptoms:
If you are digging into the W-1 itself, here are the primary mechanical culprits to inspect:
The Accelerator Pump Circuit (Dry Starts)
If the engine requires several pumps of the pedal to start when cold, but the venturi isn't receiving a strong, steady squirt of fuel, your pump circuit is failing.
-
The Leather Cup: The pump relies heavily on the condition of the leather cup to seal against the cylinder wall. Because traditional leather pump cups do not use expander springs to force them against the cylinder, they rely entirely on proper sizing and soaking (usually in light oil) to maintain their flare. If the leather dries out, shrinks, or becomes stiff, the pump will simply bypass fuel back into the bowl instead of forcing it out the discharge nozzle.
-
Check Balls Not Seating: The W-1 uses an intake check ball (at the bottom of the pump cylinder) and a discharge check ball. If debris prevents the intake ball from seating on the downstroke, the fuel is pushed right back into the bowl. If the discharge ball doesn't seat, the pump loses its prime, and air gets drawn into the passage on the upstroke.
- Easily test the pump by pumping the gas once, engine off and looking down the carburetor. You should see a strong squirt of gas.
Choke and Fast Idle Linkage
For a cold start, the choke valve must close completely to create the high vacuum necessary to pull raw fuel from the main discharge nozzle.
-
Valve Seating: Verify that pulling the choke cable closes the choke plate 100% against the air horn. Even a slight gap will lean out the starting mixture too much.
-
Fast Idle Cam: Ensure the fast idle linkage properly cracks the throttle plate open slightly when the choke is engaged. If the throttle remains completely closed, the engine won't get enough air to fire, even with a rich mixture.
Fuel Bowl Evaporation and Percolation
Modern ethanol-blended fuels boil at a much lower temperature than vintage fuels.
-
Cold Start (Empty Bowl): If the vehicle sits for a few days, the fuel in the vented bowl can completely evaporate. The mechanical fuel pump then has to crank for a long time just to refill the bowl before the engine can fire.
-
Hot Start (Flooding): After shutting off a hot engine, the heat soaking into the cast iron manifold boils the fuel inside the W-1's bowl (percolation). This expanding vapor pushes raw fuel out of the discharge nozzle and down into the intake manifold, severely flooding the engine and making it very difficult to restart until it cools.
Bowl Runs Dry When Sitting
Why Your Carter W-1 Float Bowl Runs Dry After Sitting
It is one of the most common frustrations with classic 1930s and 40s vehicles: you go to fire up a Chevy that has been sitting for a week, and it requires an eternity of cranking before it finally catches. You check the Carter W-1, pump the throttle, and realize the venturi is completely dry.
When a downdraft carburetor like the W-1 loses its prime while sitting, it usually comes down to evaporation, heat soak, or internal seepage. Here is exactly where that fuel is going and what to look for on the bench.
1. Modern Fuel Volatility and Evaporation
The most frequent culprit isn't a mechanical failure at all—it's modern gasoline. The Carter W-1 features a vented cast-iron fuel bowl designed in an era when gasoline had a much lower vapor pressure.
Today's ethanol-blended fuels boil and evaporate at significantly lower temperatures. If the vehicle sits in a warm garage for several days, the fuel simply evaporates out of the bowl vent and into the atmosphere. By the time you try to start the engine, the mechanical fuel pump has to run long enough to completely refill the dry bowl before fuel can be drawn into the idle or main circuits.
2. Heat Soak and Percolation
If the bowl runs dry shortly after shutting off a hot engine, you are likely dealing with percolation.
The W-1 sits directly above the hot cast-iron intake and exhaust manifolds. When you shut the engine off, the cooling fan stops, and a massive wave of radiant heat soaks up into the carburetor base. Because modern fuel boils easily, it begins to "percolate" inside the bowl. The expanding vapor forces raw, liquid gas up and out of the main discharge nozzle, draining the bowl directly into the intake manifold.
-
The symptom: Hard hot-starts and a flooded engine immediately after shutting it down, followed by a dry bowl a few hours later.
-
The fix: Ensure the thick phenolic heat-insulator spacer is installed between the carburetor base and the intake manifold to block that heat transfer. Also, check that the anti-percolator valve (if your W-1 model uses one) is adjusted correctly to vent the main well when the throttle is closed.
3. Internal Seepage at the Base
If evaporation and heat soak are ruled out, gravity might be doing the work. The W-1 has passages machined into the bottom of the fuel bowl casting. These passages were sealed at the factory using small lead or brass plugs.
Over decades of use, corrosion, vibration, or aggressive cleanings can cause these plugs to seep. If the main jet plug or the idle passage plug at the bottom of the bowl has a microscopic leak, the fuel will slowly drain down into the throat of the carburetor over a few days.
-
To test this: Take the carburetor off the manifold, fill the bowl with naphtha or non-ethanol fuel, set it on a piece of clean cardboard, and let it sit overnight. If the cardboard is wet the next morning, you have a leaking base plug that needs to be sealed.
4. The Accelerator Pump Illusion
Sometimes the bowl isn't entirely dry, but it looks like it is because the accelerator pump circuit has failed. When you actuate the throttle on a cold engine, you expect a strong squirt of fuel from the pump jet. If nothing comes out, it is easy to assume the bowl is empty.
However, the W-1 relies on a leather pump cup to seal against the cylinder wall on the downstroke. Because traditional leather pump cups do not use expander springs to force them against the cylinder walls, they rely entirely on proper sizing and the flare they get from being soaked in oil (like Neatsfoot) before installation.
If that leather dries out and shrinks while sitting, it will simply bypass the fuel inside the cylinder rather than pushing it out the discharge nozzle. The engine won't get its starting prime, mimicking a dry bowl.
Metering Rod Loose?
Throttle Shaft Loose?
Gas is coming from the shaft because the carburetor is flooding and gas is running down to the throttle plate and out of the shaft.
Shafts can never be tight enough to seal.
We do not do repairs, but I have a couple of people that do it well. See our recommended companies here.
We do have bushings, but they are sold by size. Don't know what the W-1 takes as they seldom need it.
Find out why your carburetor is flooding. Once that is fixed the leak out of the throttle shaft should stop.
Where do the jets go?
The only "economizer jet" in a W-1 is the main jet (in the bottom of the bowl) as it interacts with the throttle-position-controlled metering rod. This is true of most Carter main metering systems, whether activated mechanically or by vacuum (BB carbs being one exception I can think of).
Hope this helps.
Concave washer problems
The W-1 uses a copper washer sometimes concaved. If you experience a leak at any of these spots check to make sure the old washer is removed. They hide well and often get missed.
Use an awl, or pick to pry up on it. The threads are tough.
- Question: I recently ordered the K4062 carb kit for my carter W-1 part number 838938 on the brass tag. During disassembly, I noticed all of the brass plug washers are flat not conical. The kit provides 4 conical seals and only one flat. The flat included in the kit was item 31 on the kit's part list. The rest of the plugs, 4 total have no flat brass washers. The kit parts list seems to indicate that there are conical and flat for items 7,28,31,36, and 39 of the parts list. The kit I received does not have the flat washers included.
Answer: The washers in the kit are correct for the carburetor number it includes. Unfortunately we don't have any flat washers that I can send you. My guess is that you have copper washers, which would be impossible to find. My suggestion would be to re-use your old washers. Clean then well and for extra measure get some Permatex anaerobic and put a very small amount on both sides of the washers. This will go a long ways to make sure they seal.
Only Runs With Choke Partially Closed
This is due to a lack of fuel, or possibly a vacuum leak.If a vacuum leak you will probably hear a hissing, or whistling noise. Spray carburetor cleaner around the mount and any other vacuum source. If the idle smooths out, you found your problem.
As far as a lack of fuel, check the following not in any order.
- Kink, or restricted fuel line
- Weak fuel pump
- Float level
- Float drop - The float may not be moving down enough to let the needle come out of the seat.
- Float rubbing the side of the float bowl.
- Test the float for leaking - any fluid or excess solder inside the float will cause it to sink. Heat some water and immerse the float. Any bubbles indicate a leak.
- Passage plugged - possibly restricted below the main jet. Carefully blow through each passage to make sure the passage is open.
- Main jet too small - not likely unless it's a new carburetor for the vehicle. W-1 jets are not available. The old jet can be drilled to a larger size. To make smaller, solder shut and re-drill.
- Metering rod not pulling out far enough - There is no adjustment, but look at the arm connection to the metering rod to be sure it's moving up and down as required.
- Wrong metering rod - If you don't know the history of the carburetor, the rod could have been replaced with the wrong rod. New rods are not available and unless you have the tag with the carburetor number you will not be able to determine which rod it requires.
- Restricted air cleaner
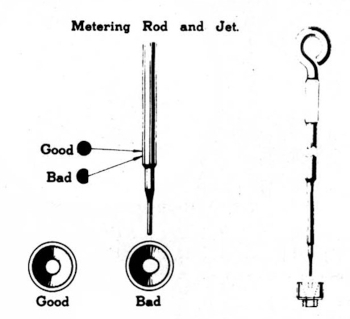
gasoline economy. at all speeds above 20 m.p.h.
If the metering rod linkage is adjusted too high, it
will affect gasoline mileage at all speeds above
20 m,p.h. Changing the adjustment of a metering
rod 1/16 will definitely affect gasoline economy.
A worn metering rod will have the same effect
upon gasoline economy as a metering rod that is
too rich and must be replaced.
